Overview
The most important feature of ZCP v2 is Multi Cluster support. In ZCP v1, ZCP was installed separately for each cluster, allowing applications to be deployed, logs to be collected, and monitoring metrics to be gathered only within that cluster. ZCP v2, however, is centrally structured around a Control Plane cluster, managing multiple Data Plane clusters, deploying applications, and collecting data in a centralized manner.
The concepts of ZCP Application (hereafter referred to as ZCP Application to distinguish it from general applications) and Deploy Group in ZCP v2 are designed for CI/CD across multiple clusters. CI/CD ultimately automates the process of building applications and continuously deploying them to the desired environments. For a single cluster, performing CI/CD once, following the build → deployment process, is usually sufficient. However, in a multi-cluster scenario (where there are multiple target environments for deployment), the build should be performed only once, while deployment should be executable multiple times by changing the target. In ZCP v2, the concepts of ZCP Application (for building applications) and Deploy Group (for deploying to desired clusters) were introduced to separate the build and deployment processes.
Typically, a build/deployment pipeline for Kubernetes follows the process: Source Checkout → Application Build → Docker Image Build & Push → Deploy. ZCP Application handles Source Checkout → Application Build → Docker Image Build & Push. It is designed to check out the development team’s source code and create a Kubernetes-deployable Docker image with minimal UI configuration, without requiring custom scripts. The pipeline engine performing these tasks uses the open-source CI/CD framework Tekton.
Supported tools
Version Control Tool: GIT
Build Tools: Maven, Gradle, NPM
Creating a ZCP Application
A ZCP Application is mapped 1:1 with an MSA Application. One ZCP Application is created per MSA Application.
Since the goal of a ZCP Application is to convert the source code from the version control system into a deployable image, before creating one, you need the Git repository URL containing the application source, a Git account, the registry URL where the image will be stored, a registry account, and the Dockerfile to create the Docker image.
Create Application
Click the Create Application button.
Select Source Type
Currently, only standard Git is supported. Any Git server supporting standard Git, such as Gitea, GitHub, or GitLab, can be used. Additional source types may be added in the future.
Enter Basic Information
Enter the basic information for the ZCP Application.
Name (Required): The name of the ZCP Application, used internally within the system (e.g., labels).
Display Name: The name displayed on the console screen. If left blank, the Name will be displayed.
Description: A description of the ZCP Application.
Enter Source Repository Information
Enter the repository information for the source code to be checked out during the build process.
Git Repository (Required): The clone URL of the Git repository.
Authentication (Required): Select the authentication type. Currently, only Basic Authentication (ID, Password) is supported.
Secret (Required): Select the account information. Account information is managed as a Secret and can be reused within the Project. Follow the steps below to register and select a Secret.

Managing Secrets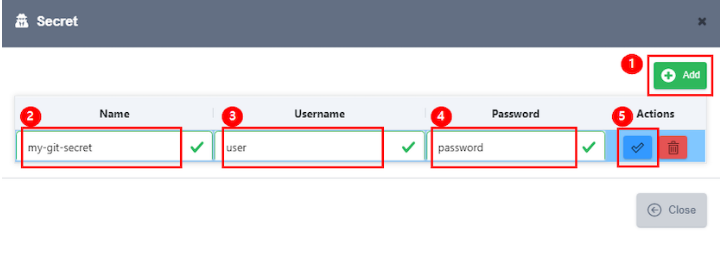
Click the Add button to create a new row for a Secret.
Enter the Secret Name. Only lowercase letters, numbers, and dashes (-) are allowed.
Enter the Git user account for source checkout. This account must have repository creation permissions. The Deploy Group requires a separate GitOps repository for deployment, which will be created using this account and used for GitOps deployments.
Enter the Git Password.
Once completed, click the Save button to store the Secret.

In the same screen, you can also edit or delete existing Secrets.
After selecting the created Secret, click the Test Connection button to verify access.
Enter Container Image Information
Enter the details of the Image Registry where the built Container Image will be stored.
Image Build (Required): If the Image Build checkbox is unchecked, only the application build will be performed without generating an image. The generated library can be pushed to repositories like Nexus or Artifactory.
Image Repository (Required): Enter the URL of the Image Repository where the Container Image will be uploaded.
Secret (Required): Enter the account information needed to upload the Image. As with the Source Repository, you can register and select account information through the Secret management screen.
Context: Enter the path for the Build Context, where files needed for image building (such as source code, artifacts, and meta files) are located. If left blank, the root path of the Source Repository is used by default.
Dockerfile: Enter the filename of the Dockerfile, which contains the commands required for building the Image. The default value is Dockerfile.
Image Build Argument: You can add key-value type environment variables or parameters for the Image build process.
After entering the basic information, click the Save button to create the ZCP Application.
After saving, the created ZCP Application appears in the list.
The meaning of each item in the table is as follows:
Item Name | Description |
|---|---|
Name | The name of the ZCP Application. Clicking it navigates to the details page. |
Description | Description of the ZCP Application. |
Source Repo. | The path to the application’s source repository. |
Image Registry | The registry path where the Container Image is uploaded. |
Setting Up a Pipeline
A single ZCP Application can create multiple build pipelines. Each pipeline can use different branches, build tools, or build options.
Click on the name of the created ZCP Application or the Edit button in the Actions column to navigate to the details screen.
The details screen consists of three tabs: Overview, Basic Info, and Build Pipeline.
The Overview tab displays summary information of each pipeline and the results of the last executed build. You can start a build or check past build history using the Actions button on the right.
The Basic Info tab allows you to view and modify the basic information entered during creation.
The Build Pipeline tab allows you to configure the build pipeline necessary for actual build execution.
Pipeline Details
One or more pipelines can be created, and each pipeline can specify different branches, build tools, and build parameters.
A pipeline is structured as shown below:
Pipeline Name (Required): A name for identifying the pipeline.
Branch (Required): The branch name to check out the source from when executing the pipeline. Multiple branches in a single source repository can each be assigned separate pipelines. For example, an application with develop, staging, and master branches can have separate pipelines for each branch.
Build History Count (Required): The number of build history entries to retain.
Build Tool (Required): The build tool to use. Supported build tools are Maven, Gradle, and NPM. If you need to use an unsupported build tool (e.g., Ant), set Build Tool to None and execute the build inside a Dockerfile.
Maven

JDK Version: Specifies the JDK version for the build.
Maven Goals: Specifies the Maven command. Typically, the
packagegoal is used to generate an artifact.Mirror URL: If direct access to a public Maven repository is not available, a mirror such as Nexus or Artifactory should be specified. The mirror must be public (accessible without ID and password).
Gradle

JDK Version: Specifies the JDK version for the build.
Gradle Task: The Gradle task used to generate the artifact. Typically,
buildNeededis used, whileBootJaris common for Spring Boot applications.Gradle Properties: Specifies build property values in a key=value format. These values can override those in the gradle.properties file.
Command Line Options: Additional options to append to the Gradle command during execution.
NPM

Node Version: Specifies the Node.js version for the build.
NPM Task Command (excluding install): Specifies the command to execute, excluding the install command.
INSTALL Y/N: Determines whether to execute
npm install.Context Path (package.json): Specifies the path to the
package.jsonfile referenced during installation.
None
When Build Tool is set to None, only container builds using a Dockerfile are performed.
Dockerfile Path: Specifies the path to the Dockerfile used for image building. If unspecified, the Dockerfile defined in Basic Info is used. If no Dockerfile is specified there either, the repository root's Dockerfile is used by default.
Auto Tagging: Determines whether to automatically generate an image tag during the build. If set to Yes, the automatically generated build number is used as the image tag. If not set, the user must manually enter an image tag for each build.
Tag Prefix: The prefix added to the tag name when auto-tagging is enabled. For example, if the Tag Prefix is "dev," the generated tags will be dev-1, dev-2, etc.
Image Build Argument: Specifies key-value environment variables or parameters for the image build.
After entering all information, click the Save button to store the pipeline. You can then check the pipeline list in the Overview tab.
It's a good idea to enjoy the taste and taste.
Item name | Explanation |
|---|---|
Name | パイプラインを識別するためのパイプライン名。 |
Branch | ビルドの実行時にソースをチェックアウトするブランチ名。 |
Tag Prefix | ビルドを実行しながら自動的にタグ生成時にタグ名の前に付くPrefix名です。 Auto TaggingをYesに指定した場合にのみ有効です。 |
Last Created Image | そのパイプラインが最後に実行されたときに作成されたImageのURL。 |
Last Build | 最後のビルドが実行された時間。 |
Build Status | ビルドの実行結果です。 各アイコンの意味は、ビルド成功、ビルド失敗、ビルド実行中です。 |
Actions | パイプラインに対してアクションを実行できるボタンです。 履歴/ログ表示、ビルド実行ボタン。 |
ビルドを実行する
ビルドは、ZCP Application Details画面のOverviewタブで実行できます。
実行したいパイプラインの[Actions]列の[Run]ボタンをクリックします。 Auto Taggingが設定されているパイプラインはすぐにログ画面に進み、Auto Taggingが設定されていないパイプラインはタグ名の入力ポップアップを表示します。
Auto Taggingが設定されているパイプラインはすぐにログ画面に進みます。
(1) ビルド情報セクションです。
Result : 빌드 실행 결과가 표시됩니다. 빌드 실행 중인 경우 Spinner 가 표시됩니다.
Source : 빌드 시 사용 되는 소스 코드의 Repository URL 입니다.
Artifact : 빌드의 결과물에 대한 정보입니다. 이번 빌드로 생성되는 Image 의 URL 입니다.
(2) 빌드 파이프라인의 실행 단계 섹션입니다. 상위 메뉴를 태스크, 서브 메뉴를 스텝 이라고 합니다. 빌드 파이프라인의 태스크는 3단계로 나뉩니다.
파이프라인의 빌드 툴을 설정하지 않은 경우 (None) Source Checkout, Image Build & Push 두 단계의 태스크만 수행이 됩니다.
각 스텝을 클릭하면 해당 스텝의 실행 로그를 확인할 수 있습니다.
(3) 로그 섹션입니다. 실행 중인 빌드의 로그를 실시간으로 표시합니다. 이미 실행이 완료된 지난 빌드의 로그도 확인할 수 있습니다.
(4) OK 버튼을 클릭하면 빌드 로그 팝업 화면이 닫힙니다.
빌드 이력 보기
파이프라인 별로 지난 빌드의 이력을 확인할 수 있습니다.
ZCP Application 의 Overview 탭에서 빌드 이력을 보고 싶은 파이프라인의 History 버튼을 클릭합니다.
지난 빌드의 실행 이력이 카드 UI 로 표시됩니다. build pipeline에서 설정한 build history count 갯수 만큼의 빌드 이력을 확인할 수 있습니다.
각 항목의 상세 내용은 아래와 같습니다.
(1) 빌드의 실행 결과 아이콘입니다. 빌드 성공, 빌드 실패, 실행 중 3가지 상태가 있습니다.
(2) 빌드 결과의 요약 정보입니다.
Build No : 빌드 번호입니다. 빌드 번호는 빌드가 실행 될 때마다 자동으로 채번됩니다. 파이프라인 별로 빌드 번호를 따로 가지고 있습니다. 괄호 안의 내용은 빌드 결과입니다.
Build Time : 빌드의 시작 시간과 빌드 종료 시간입니다. 우측에는 빌드의 전체 소요 시간이 표시됩니다.
Image : 빌드의 실행 결과물인 Image 의 URL 입니다. Image Registry, project, repository, 태그 번호로 이루어져 있습니다.
Branch : 빌드 수행 시 사용 된 소스 코드의 브랜치명입니다.
User ID : 해당 빌드를 수행한 사용자의 ID 입니다.
(3) 빌드 로그 보기 버튼입니다.
빌드 중지하기
실행 중인 빌드 로그 화면 또는 빌드 이력 화면의 중지 버튼을 클릭하여 실행 중인 빌드를 즉시 중단 할 수 있습니다.